Volume 19: Difference between revisions
| Line 56: | Line 56: | ||
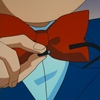
The suspects grow restless of the stalled investigation and begin heading for the exit. Suddenly, Professor [[Hiroshi Agasa|Agasa]]'s voice booms, demanding the three remain. Even Agasa himself is taken aback, twirling around to ask what [[Conan Edogawa|Conan]] is doing with his [[Voice-Changing Bowtie|bowtie]]. The boy reveals he has solved the case and intends to use Agasa as his deductive conduit. | The suspects grow restless of the stalled investigation and begin heading for the exit. Suddenly, Professor [[Hiroshi Agasa|Agasa]]'s voice booms, demanding the three remain. Even Agasa himself is taken aback, twirling around to ask what [[Conan Edogawa|Conan]] is doing with his [[Voice-Changing Bowtie|bowtie]]. The boy reveals he has solved the case and intends to use Agasa as his deductive conduit. | ||
<spoiler> | <spoiler> | ||
[[File: | [[File:CH181_BookTrick.png|thumb|right|200px|The pawn formation topples and the notebook lands atop the key.]] | ||
'''The Method:'''<br> | '''The Method:'''<br> | ||
Agasa explains the culprit circumvented the locked door by using voicemail, a cassette tape, and a chess piece. Conan appears from behind the Professor to lead a demonstration. He begins by unraveling the cassette's tape to create a large loop that stretches out of the container. Then, the cassette is inserted into the landline phone with the large loop left outside of the phone. Conan then pulls on the loop until he is outside of the room before passing the key-ring through the loop. Leaving the key outside, the boy returns to the landline with the remaining length of the loop. He approaches the position of the notebook and positions three chess pawns in a triangle formation, balancing the notebook atop the three. Finally, he passes the tip of the loop around the pawn closest to the landline and concludes his contraption. Ultimately, the contraption is designed to pull the loop of cassette tape into the landline by recording a voicemail. In doing so, the key is pulled through the locked door and collides with the chess pawns, toppling the three pieces and leaving the key stuck under the notebook.<br> | Agasa explains the culprit circumvented the locked door by using voicemail, a cassette tape, and a chess piece. Conan appears from behind the Professor to lead a demonstration. He begins by unraveling the cassette's tape to create a large loop that stretches out of the container. Then, the cassette is inserted into the landline phone with the large loop left outside of the phone. Conan then pulls on the loop until he is outside of the room before passing the key-ring through the loop. Leaving the key outside, the boy returns to the landline with the remaining length of the loop. He approaches the position of the notebook and positions three chess pawns in a triangle formation, balancing the notebook atop the three. Finally, he passes the tip of the loop around the pawn closest to the landline and concludes his contraption. Ultimately, the contraption is designed to pull the loop of cassette tape into the landline by recording a voicemail. In doing so, the key is pulled through the locked door and collides with the chess pawns, toppling the three pieces and leaving the key stuck under the notebook.<br> | ||
[[Ai Haibara|Haibara]] ridicules his deduction, stating that the base of the pawns are sturdy enough to resist toppling. Conan states that the pawns are to be placed on their heads, thus significantly decreasing their structural stability. The boy commences the experiment and the desired outcome is achieved.<br> | [[Ai Haibara|Haibara]] ridicules his deduction, stating that the base of the pawns are sturdy enough to resist toppling. Conan states that the pawns are to be placed on their heads, thus significantly decreasing their structural stability. The boy commences the experiment and the desired outcome is achieved.<br> | ||
Based on the results, [[Sango Yokomizo|Sango]] deduces that the culprit must be '''Akira Shirakura''', who had left over ten voicemails on Hirota's landline.<br> | Based on the results, [[Sango Yokomizo|Sango]] deduces that the culprit must be '''Akira Shirakura''', who had left over ten voicemails on Hirota's landline.<br> | ||
'''The Evidence:'''<br>[[File: | '''The Evidence:'''<br>[[File:CH181_ShirakuraNamed.png|thumb|left|200px|Shirakura is named as the culprit.]] | ||
Shirakura retorts, asking why he would return to the scene of the crime. Agasa answers that he came to retrieve a vital piece of evidence: the cassette tape that is laced with his finger prints. Agasa infers that Hirota's murder was not pre-meditated. Instead, Shirakura likely killed him in a moment of passion. Therefore, he did not bring gloves to the crime scene and only by luck did he manage to think of and perform the demonstrated trick. Shirakura hoped to be the one to discover and report the murder, giving him ample time to replace the cassette, but he was beat to it by Conan's company. With no other choice, he had to follow through on his voicemail's promise and arrive at the scene. Lastly, Agasa suggests looking for Hirota's missing floppy disks at Shirakura's abode, noting that he likely stole them on-mass given his time constraints. Defeated, Shirakura admits they are stashed in his car parked outside.<br> | Shirakura retorts, asking why he would return to the scene of the crime. Agasa answers that he came to retrieve a vital piece of evidence: the cassette tape that is laced with his finger prints. Agasa infers that Hirota's murder was not pre-meditated. Instead, Shirakura likely killed him in a moment of passion. Therefore, he did not bring gloves to the crime scene and only by luck did he manage to think of and perform the demonstrated trick. Shirakura hoped to be the one to discover and report the murder, giving him ample time to replace the cassette, but he was beat to it by Conan's company. With no other choice, he had to follow through on his voicemail's promise and arrive at the scene. Lastly, Agasa suggests looking for Hirota's missing floppy disks at Shirakura's abode, noting that he likely stole them on-mass given his time constraints. Defeated, Shirakura admits they are stashed in his car parked outside.<br> | ||
'''The Motive:'''<br> | '''The Motive:'''<br> | ||
| Line 68: | Line 68: | ||
</spoiler> | </spoiler> | ||
<br> | <br> | ||
[[File: | [[File:CH181_HaibaraTears.png|thumb|left|200px|Haibara's true tears.]] | ||
Sango congratulates Agasa on his brilliant deduction, though refuses to hand over the requested floppy disk as it is classified as investigative evidence. Before Conan can leave, he is stopped by a teary-eyed Haibara. She asks why he did not save her sister, [[Akemi Miyano|Akemi]], who operated under the alias "Masami Hirota" during her missions for the [[Black Organization]].<ref name="¥1,000,000,000_Robbery"> One Billion Yen Robbery Case (Manga: [[Volume_2#¥1,000,000,000_Robbery|Volume 2: 13-16]])</ref> The girl breaks down in front of Conan, who can only stand there silently while thinking on both his past regrets and the authenticity of Haibara's emotions.<br> | Sango congratulates Agasa on his brilliant deduction, though refuses to hand over the requested floppy disk as it is classified as investigative evidence. Before Conan can leave, he is stopped by a teary-eyed Haibara. She asks why he did not save her sister, [[Akemi Miyano|Akemi]], who operated under the alias "Masami Hirota" during her missions for the [[Black Organization]].<ref name="¥1,000,000,000_Robbery"> One Billion Yen Robbery Case (Manga: [[Volume_2#¥1,000,000,000_Robbery|Volume 2: 13-16]])</ref> The girl breaks down in front of Conan, who can only stand there silently while thinking on both his past regrets and the authenticity of Haibara's emotions.<br> | ||
One week later, the police return the floppy disk to the Agasa residence. Haibara inserts the disk onto Agasa's desktop, explaining that all Black Organization files are password encrypted, thus allowing for the contents of the disk to remain untampered by police investigation. She adds that not only does the disk contain data on [[APTX4869]] but also contains critical information about the identities of several Black Organization members as well as sponsors of the pharmaceutical research.<br>[[File: | One week later, the police return the floppy disk to the Agasa residence. Haibara inserts the disk onto Agasa's desktop, explaining that all Black Organization files are password encrypted, thus allowing for the contents of the disk to remain untampered by police investigation. She adds that not only does the disk contain data on [[APTX4869]] but also contains critical information about the identities of several Black Organization members as well as sponsors of the pharmaceutical research.<br>[[File:CH181_NightBaronVirus.png|thumb|right|200px|The Night Baron Computer Virus wipes the floppy disk's data.]] | ||
Meanwhile, [[Gin]] and [[Vodka]] drive through the streets of town while discussing Haibara's whereabouts. Gin remains confident about their chances of locating her and remains unconcerned about their floppy landing in the hands of the police, hinting towards a special property of the disk.<br> | Meanwhile, [[Gin]] and [[Vodka]] drive through the streets of town while discussing Haibara's whereabouts. Gin remains confident about their chances of locating her and remains unconcerned about their floppy landing in the hands of the police, hinting towards a special property of the disk.<br> | ||
Back at the Agasa residence, Haibara, Conan, and Agasa stare in shock at the rapidly corrupting computer screen. Haibara infers that it must be the [[Night Baron|Night Baron Computer Virus]] that activates whenever an Organization's disk is accessed on a non-approved hardware.<ref name="Night_Baron_Murder_Case"> Night Baron Murder Case (Manga: [[Volume_8#Night_Baron_Murder_Case|Volume 8: 72-77]])</ref> With the floppy's data completely wiped, Haibara remarks that she will have to stick around for the long-run. | Back at the Agasa residence, Haibara, Conan, and Agasa stare in shock at the rapidly corrupting computer screen. Haibara infers that it must be the [[Night Baron|Night Baron Computer Virus]] that activates whenever an Organization's disk is accessed on a non-approved hardware.<ref name="Night_Baron_Murder_Case"> Night Baron Murder Case (Manga: [[Volume_8#Night_Baron_Murder_Case|Volume 8: 72-77]])</ref> With the floppy's data completely wiped, Haibara remarks that she will have to stick around for the long-run. | ||
Revision as of 16:33, 13 June 2026
| ‹ Volume 18 | List of Chapters • List of Cases | Volume 20 › |
| Volume 19 | |||
|
| |||
| Release date: | April 18, 1998 | ||
|---|---|---|---|
| Chapters: | 181-190 | ||
| ISBN: | ISBN 4-09-125049-1 | ||
| Publisher: | Shogakukan | ||
| English release date: | September 18, 2007 | ||
| English ISBN: | ISBN 1-4215-0884-2 | ||
| English Publisher: | Viz Media | ||
| |||
| |||


Volume 19 was released on April 18, 1998 in Japan.
Cast


Gadgets


Chapters
Murdered Professor Case
File 181 - Why...
The suspects grow restless of the stalled investigation and begin heading for the exit. Suddenly, Professor Agasa's voice booms, demanding the three remain. Even Agasa himself is taken aback, twirling around to ask what Conan is doing with his bowtie. The boy reveals he has solved the case and intends to use Agasa as his deductive conduit.


Sango congratulates Agasa on his brilliant deduction, though refuses to hand over the requested floppy disk as it is classified as investigative evidence. Before Conan can leave, he is stopped by a teary-eyed Haibara. She asks why he did not save her sister, Akemi, who operated under the alias "Masami Hirota" during her missions for the Black Organization.[1] The girl breaks down in front of Conan, who can only stand there silently while thinking on both his past regrets and the authenticity of Haibara's emotions.
One week later, the police return the floppy disk to the Agasa residence. Haibara inserts the disk onto Agasa's desktop, explaining that all Black Organization files are password encrypted, thus allowing for the contents of the disk to remain untampered by police investigation. She adds that not only does the disk contain data on APTX4869 but also contains critical information about the identities of several Black Organization members as well as sponsors of the pharmaceutical research.

Meanwhile, Gin and Vodka drive through the streets of town while discussing Haibara's whereabouts. Gin remains confident about their chances of locating her and remains unconcerned about their floppy landing in the hands of the police, hinting towards a special property of the disk.
Back at the Agasa residence, Haibara, Conan, and Agasa stare in shock at the rapidly corrupting computer screen. Haibara infers that it must be the Night Baron Computer Virus that activates whenever an Organization's disk is accessed on a non-approved hardware.[2] With the floppy's data completely wiped, Haibara remarks that she will have to stick around for the long-run.
People


Major events
- Haibara's past is explored, as well as her relationship to Akemi Miyano.
- Haibara's relationship with Akemi is discussed, as well as her history with the Black Organization.
Mystery Writer Case
Characters introduced
| Detective Samonji | |
|---|---|
 |
|
File 182 - The Writer that Disappeared
File 183 - Climax of Half
File 184 - In France...
People


Stabbed Wallet Case
Characters introduced
| Kazuha Toyama | |
|---|---|
 |
|
| Ginshiro Toyama | |
|---|---|
 |
|
| Goro Otaki | |
|---|---|
 |
|
| Ki'ichiro Numabuchi | |
|---|---|
 |
|
File 185 - The Living City
File 186 - The Fourth Wallet
File 187 - In The Wallet...
File 188 - The Secret of the Driving License
People


Stadium Threatening Case
Characters introduced
| Miwako Sato | |
|---|---|
 |
|
File 189 - The Endangered Ball
File 190 - The 56 Thousand Hostages
People


Trivia
- The title for each chapter are worded as the following in Case Closed:
- File 182 - The Mystery Writer Vanishes
- File 183 - Half of the Top
- File 184 - When in France
- File 185 - Gourmet City
- File 187 - Inside the Wallet
- File 188 - The Secret of the Driver's Liscense
- File 189 - The Burst Ball
- File 190 - 56,000 Hostages
Cover in other countries
China 
China (2020 reissue) 
Finland 
France 
Germany 
Hong Kong 
Indonesia 
Indonesia (reprint) 
Indonesia (Premium, combined volumes 19-20) 
Italy (Comic Art) 
Italy (Star Comics) 
Italy (La Gazzetta dello Sport) 
Italy (New Edition) 
Korea 
Malaysia (Chinese) 
Malaysia (Malay) 
Norway 
Rep. of China (Taiwan) 
Philippines 
Singapore (Chinese) 
Spain (Catalan) 
Spain (Spanish, Volumen 2, part 1) 
Spain (Spanish, Volumen 2, part 2) 
Spain (Spanish, New Edition, combined volumes 19-20) 
Sweden 
Thailand 
United States 
Vietnam 
Vietnam (New Edition)


See also
| Volumes of the Manga | ||
|---|---|---|
| Volume 1 • 2 • 3 • 4 • 5 • 6 • 7 • 8 • 9 • 10 • 11 • 12 • 13 • 14 • 15 • 16 • 17 • 18 • 19 • 20 • 21 • 22 • 23 • 24 • 25 • 26 • 27 • 28 • 29 • 30 • 31 • 32 • 33 • 34 • 35 • 36 • 37 • 38 • 39 • 40 • 41 • 42 • 43 • 44 • 45 • 46 • 47 • 48 • 49 • 50 • 51 • 52 • 53 • 54 • 55 • 56 • 57 • 58 • 59 • 60 • 61 • 62 • 63 • 64 • 65 • 66 • 67 • 68 • 69 • 70 • 71 • 72 • 73 • 74 • 75 • 76 • 77 • 78 • 79 • 80 • 81 • 82 • 83 • 84 • 85 • 86 • 87 • 88 • 89 • 90 • 91 • 92 • 93 • 94 • 95 • 96 • 97 • 98 • 99 • 100 • 101 • 102 • 103 • 104 • 105 • 106 • 107 • 108 • 109 |
- ^ One Billion Yen Robbery Case (Manga: Volume 2: 13-16)
- ^ Night Baron Murder Case (Manga: Volume 8: 72-77)