Difference between revisions of "Find the Buttock's Mark"
m (Manga source) |
Black Demon (talk | contribs) (→Resolution) |
||
| (47 intermediate revisions by 7 users not shown) | |||
| Line 4: | Line 4: | ||
| title = Find the Buttock's Mark | | title = Find the Buttock's Mark | ||
| english-title = | | english-title = | ||
| − | | japanese-title = | + | | japanese-title = お尻のマークを探せ <br /> (Oshiri no Māku o Sagase) |
| season = [[Season 12|12]] | | season = [[Season 12|12]] | ||
| − | | manga = [[Volume 42|Volume 42: File 11]]~[[Volume 43|Volume 43: File 2]] | + | | manga = [[Volume 42|Volume 42: File 11 (435)]] ~<br>[[Volume 43|Volume 43: File 2 (436-437)]] |
| airdate = January 12, 2004 (Part 1)<br> January 19, 2004 (Part 2) | | airdate = January 12, 2004 (Part 1)<br> January 19, 2004 (Part 2) | ||
| english-airdate = | | english-airdate = | ||
| − | | cast = [[Conan Edogawa]] <br> [[Ai Haibara]] <br> [[Detective Boys]] | + | | cast = [[Conan Edogawa]] <br> [[Ai Haibara]] <br> [[Detective Boys]] <br> [[Jodie Starling]] <br> [[Ran Mouri]] <br> [[Sonoko Suzuki]] <br> [[James Black]] <br> [[Miwako Sato]] <br> [[Wataru Takagi]] <br> [[Juzo Megure|Inspector Megure]] <br> [[Detective Chiba]] <br> [[Hiroshi Agasa|Professor Agasa]] <br> [[Yukiko Kudo]] <br> [[Vermouth]] |
| suspects = | | suspects = | ||
| solved-by = [[Conan Edogawa]] | | solved-by = [[Conan Edogawa]] | ||
| + | | next-conan-hint = Key cylinder (Part 1) <br> Seal (Part 2) | ||
| + | | director = [[Masato Sato]] | ||
| + | | screenplay = | ||
| + | | organizer = 346 [[Yasumi Mikamoto]]<br>347 [[Nana Harada]] | ||
| + | | storyboard = 346 [[Yasumi Mikamoto]]<br>347 [[Nana Harada]] | ||
| + | | producer = 346 [[Katsuyoshi Yatabe]]<br>347 [[Nana Harada]] | ||
| + | | animation-director = 346 [[Takashi Yamamoto]]<br>347 [[Atsushi Aono]] | ||
| + | | opening-song = Kimi to Yakusoku Shita Yasashii Ano Basho Made | ||
| + | | closing-song = Kimi to Iu Hikari | ||
| prev-episode = Head-to-Head Match with the Black Organization: A Dual Mystery on a Full Moon Night | | prev-episode = Head-to-Head Match with the Black Organization: A Dual Mystery on a Full Moon Night | ||
| − | | next-episode = Love, Ghosts, and | + | | next-episode = Love, Ghosts, and World Heritage |
| footnotes = | | footnotes = | ||
}} | }} | ||
| Line 29: | Line 38: | ||
{{Char|Miwako Sato}} | {{Char|Miwako Sato}} | ||
{{Char|Wataru Takagi}} | {{Char|Wataru Takagi}} | ||
| − | {{Char|Inspector Megure}} | + | {{Char|Juzo Megure|display=Inspector Megure}} |
{{Char|Detective Chiba}} | {{Char|Detective Chiba}} | ||
{{Char|Hiroshi Agasa|display=Professor Agasa}} | {{Char|Hiroshi Agasa|display=Professor Agasa}} | ||
| Line 36: | Line 45: | ||
}} | }} | ||
| − | == | + | == Gadgets == |
| + | {{Gadgets Appearances| | ||
| + | {{Gadget|Stun-Gun Wristwatch}} | ||
| + | }} | ||
| − | === | + | == Case == |
| − | |||
| − | === | + | === Situation === |
| − | == People == | + | ==== Part 1 ==== |
| + | One rainy on the way from school, [[Ayumi Yoshida|Ayumi]] collided with an escaping phantom killer and she wasn't able see the face of the killer, due to it being concealed with a hat and hood. The phantom killer fell upon collision with Ayumi and dropped his knife he used for a recent slasher attack. Once the phantom killer got up, he faced Ayumi and reached out to her. Ayumi screamed in fear of harm, but he only went to pick up a small object from the ground and then fled the scene afterwards. A clue was left behind when Ayumi realized a mark on her hand that resembled a number 5. | ||
| + | |||
| + | {{InfoBox Crime | ||
| + | | crime = Attempted Murder | ||
| + | | image = EP346-347_Case.jpg | ||
| + | | location = Streets | ||
| + | | victim = Random female civilian | ||
| + | | cause-death = | ||
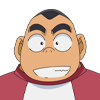
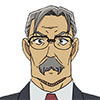
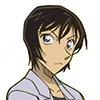
| + | | suspects = Hiroshi Enomoto, Naokazu Fukuchi, and Toshiaki Degawa | ||
| + | | description = A phantom killer dressed in a gray raincoat has been randomly slashing civilians. His face wasn't seen by the victim for his face was covered with a hat and hood. | ||
| + | }} | ||
| + | |||
| + | Afterwards, Ayumi and the Detective Boys were taken to the police department to provide information about the phantom killer, but the only thing provided was that the phantom killer was a man through Ayumi hearing his voice, but that provided little help. With Detective Sato they all returned to the scene of the crime and found out the mark left on Ayumi was of a car brand. Genta was also found with the symbol on his butt from sitting on Detective Sato's car logo. With this added information, the culprit has been narrowed down to those with cars of the same mark. | ||
| + | |||
| + | ==== Part 2 ==== | ||
| + | The suspects have been narrowed to three people: Hiroshi Enomoto, Naokazu Fukuchi, and Toshiaki Degawa. Ayumi was willing to face the suspects to find out who was the phantom killer, but Haibara objected to that plan due to concern for Ayumi's safety. Haibara explained to her how the culprit would bear a grudge on her if she placed the culprit in that kind of predicament and how he may also seek revenge if he was acquitted due to a lack of evidence. As a precaution, Ayumi and the others would instead watch the suspects from afar in a car with smoked glass to prevent such an outcome. | ||
| + | |||
| + | === People === | ||
{{BeginBox}} | {{BeginBox}} | ||
{{People|Hiroshi Enomoto|Hiroshi Enomoto.jpg| | {{People|Hiroshi Enomoto|Hiroshi Enomoto.jpg| | ||
| Line 56: | Line 85: | ||
{{EndBox}} | {{EndBox}} | ||
| − | == Resolution == | + | === Resolution === |
| + | <spoiler> | ||
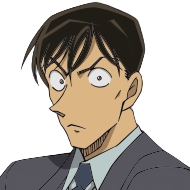
| + | The culprit is revealed to be '''Naokazu Fukuchi'''. Despite the fact that the culprit might have disposed of the key, there would still be presence of blood in the keyhole, so Conan asked Takagi to bring in the forensics to perform a Luminol test. Though initially nothing was displayed, Conan is able to sever the lock cylinder and reveal that the exterior of the keyhole had vinyl tape on top to hide any traces of blood. Fukuchi attempts to escape while searching for a key to give to Sato but is knocked out by Conan's dart. He reveals he was slashing random victims to become a renown terror and gain attention (a change to his mundane life). | ||
| + | </spoiler> | ||
| + | |||
| + | == Gallery == | ||
| + | |||
| + | {{main gallery}} | ||
| + | |||
| + | <gallery perrow="5"> | ||
| + | </gallery> | ||
== See also == | == See also == | ||
| Line 63: | Line 102: | ||
[[Category:Episodes]] | [[Category:Episodes]] | ||
| + | [[Category:Animation directed by Takashi Yamamoto]] | ||
| + | [[Category:Animation directed by Atsushi Aono]] | ||
Revision as of 11:40, 7 September 2013

Contents
Cast


Gadgets
Case
Situation
Part 1
One rainy on the way from school, Ayumi collided with an escaping phantom killer and she wasn't able see the face of the killer, due to it being concealed with a hat and hood. The phantom killer fell upon collision with Ayumi and dropped his knife he used for a recent slasher attack. Once the phantom killer got up, he faced Ayumi and reached out to her. Ayumi screamed in fear of harm, but he only went to pick up a small object from the ground and then fled the scene afterwards. A clue was left behind when Ayumi realized a mark on her hand that resembled a number 5.
| Attempted Murder | |||||||||
|
|
| ||||||||

Afterwards, Ayumi and the Detective Boys were taken to the police department to provide information about the phantom killer, but the only thing provided was that the phantom killer was a man through Ayumi hearing his voice, but that provided little help. With Detective Sato they all returned to the scene of the crime and found out the mark left on Ayumi was of a car brand. Genta was also found with the symbol on his butt from sitting on Detective Sato's car logo. With this added information, the culprit has been narrowed down to those with cars of the same mark.
Part 2
The suspects have been narrowed to three people: Hiroshi Enomoto, Naokazu Fukuchi, and Toshiaki Degawa. Ayumi was willing to face the suspects to find out who was the phantom killer, but Haibara objected to that plan due to concern for Ayumi's safety. Haibara explained to her how the culprit would bear a grudge on her if she placed the culprit in that kind of predicament and how he may also seek revenge if he was acquitted due to a lack of evidence. As a precaution, Ayumi and the others would instead watch the suspects from afar in a car with smoked glass to prevent such an outcome.


